Photographers and manufacturers who wanted to guarantee uniform and similar results across multiple countries faced difficulties as a result of these numerous systems for standardized photographic film speed sensitivity. In order to make it simpler for photographers to comprehend and utilize film independent of their location or the origin of the film, the International Organization for Standardization (ISO) developed a film speed rating system in the 1970s. The development of a more streamlined and accessible photographic experience for both pros and enthusiasts was made possible by the global standardization, which made it easier for people in the photography business to communicate and work together. This merger of ASA (American Standards Association) and DIN (Deutsches Institute fur Normung) film standards into the ISO (International Organization for Standardization) framework resulted in a unified system that facilitated consistent measurement and comparison of film sensitivity across the global photography and cinematography industries.
Similar to film photography, the ISO value on digital cameras indicates how sensitive the camera’s image sensor is to light. The ISO setting in digital cameras primarily impacts the electronic amplification of the acquired signal from the sensor, as opposed to film, where the ISO rating is inextricably linked to the physical characteristics of the film’s emulsion and its chemical processes. The image’s brightness may increase as a result of this amplification, but the image quality may suffer due to the introduction of digital noise. Both film and digital photographers use the ISO rating system to adjust sensitivity to lighting conditions and obtain desired exposure results, despite these variations in the underlying processes. In the context of photography, ISO refers to the International Organization for Standardization’s system for measuring the sensitivity of a camera’s image sensor or film to light. Originally, ISO standards were primarily associated with film photography, where it defined the sensitivity of the film to light.
It seems there might be a slight misunderstanding in your description. The term “ISO” is not an acronym derived from the abbreviation “International Organization for Standardization.” In fact, the acronym “ISO” doesn’t correspond to any specific words in any language. Instead, it’s a short, recognizable name for the organization.
The name “ISO” was chosen for simplicity and uniformity across different languages. In different languages, the organization’s name would be represented by different acronyms or terms, so they chose the short form “ISO” to maintain consistency and avoid any confusion that might arise from the translation of the full name into various languages. So, “ISO” doesn’t stand for “International Organization for Standardization,” but it’s simply the organization’s chosen short name. The organization itself is indeed responsible for developing and publishing international standards to ensure interoperability, safety, quality, and efficiency across various products and processes.

As with all types of products, ISO affects the camera’s sensitivity values and image. Photography – Abin Alex | Camera : Canon 5D Mark IV, Focal Length : 278mm, Aperture : f/5.6, Shutter Speed : 1/250sec., ISO : 800
By establishing a standardized methodology for determining ISO speed ratings, ISO speed latitude ratings, standard output sensitivity values, and recommended exposure index values, ISO 12232:2006 facilitates accurate comparisons between different digital cameras and their capabilities. This consistency enhances the ability of photographers to select the appropriate camera settings for various lighting conditions and creative intentions. Moreover, manufacturers benefit from this standard as it allows them to accurately convey the capabilities of their cameras to consumers, fostering transparency and trust in the marketplace.
The implementation of ISO 12232:2006 also encourages innovation within the digital camera industry. With a universally accepted benchmark for sensitivity and performance, manufacturers can focus on refining and advancing other aspects of camera technology, such as image processing algorithms, lens quality, and features, knowing that the ISO standard provides a reliable foundation for assessing light sensitivity. This not only drives healthy competition but also fosters improvements in image quality, low-light performance, and overall user experience. In conclusion, ISO 12232:2006 plays a vital role in the world of digital photography by providing a standardized framework for evaluating and communicating the sensitivity of digital cameras to light. This harmonized approach benefits both photographers and manufacturers, promoting informed decision-making, trust, and innovation within the industry. No matter if they are monochrome or color models, these modifications sought to create a uniform framework for assessing the capabilities and specifications of digital still cameras. The industry aimed to expedite testing procedures, enable reliable comparisons, and foster fair competition among manufacturers by putting both kinds of cameras under the same set of rules. This method not only makes it easier for experts and enthusiasts to evaluate a camera’s capabilities, but it also ensures that customers may choose a camera with greater knowledge. These defined rules aid in keeping up with developments in digital photography as technology progresses, guaranteeing that camera assessments are up to date and reliable.
With the advent of digital cameras, sensitometry has evolved to encompass the scientific study of how a photosensitive device or medium, such as a digital sensor, responds to varying levels of light exposure, ultimately impacting the quality and characteristics of captured images.
This sensitivity is indicated by an ISO number, with higher ISO values indicating greater sensitivity to light, allowing for photography in lower light conditions but potentially introducing more noise or graininess to the image. Lower ISO values are used in well-lit situations to maintain image quality with less noise. The ISO system plays a crucial role in adjusting the exposure settings of a camera to achieve the desired balance between light sensitivity, shutter speed, and aperture for capturing optimal photographs.
This versatility in ISO settings allows photographers to adapt to different scenarios. In situations with ample light, such as outdoor daylight, using a lower ISO setting like 100 or 200 can yield crisp and noise-free images. On the other hand, when faced with low-light environments or when seeking to capture fast-moving subjects, photographers can increase the ISO to higher values like 800, 1600, or even more. However, it’s important to note that higher ISO values can introduce digital noise or graininess to images, which can reduce overall image quality.
The ability to adjust ISO provides a crucial tool for creative expression as well. Photographers may intentionally use higher ISO settings to deliberately introduce a grainy texture to their images, invoking a vintage or artistic aesthetic. Additionally, the flexibility of ISO lets photographers work in challenging conditions, like indoor events or nighttime scenes, where altering shutter speed or aperture alone might not suffice to achieve the desired exposure.
In essence, ISO is a fundamental aspect of the exposure triangle, offering photographers the means to swiftly adapt to changing lighting conditions and artistic preferences. By understanding and effectively managing ISO alongside shutter speed and aperture, photographers can enhance their control over the final outcome of their images, all while exploring various visual styles and technical possibilities.
Additionally, the ‘auto mode’ in digital cameras often takes into account various other parameters, such as shutter speed and aperture, to create a well-rounded exposure triangle. It adjusts these settings on-the-fly to ensure the subject is properly focused and captured with the right amount of motion blur and depth of field. This adaptability is particularly helpful for novice photographers or in situations where quick adjustments are necessary, allowing them to capture spontaneous moments without the need for manual configuration.
Furthermore, modern digital cameras use sophisticated algorithms and sensor technologies to detect potential issues like camera shake or moving subjects. When these situations are detected in ‘auto mode,’ the camera might automatically adjust its settings, such as increasing the ISO to allow for a faster shutter speed, thereby reducing the likelihood of blurry images.
Despite its advantages, the ‘auto mode’ does have its limitations. In certain challenging lighting conditions, such as low light or high contrast scenes, the camera’s automated settings might not always yield the desired results. Photographers who possess a deeper understanding of photography techniques may opt for manual adjustments to achieve more creative control and overcome such challenges. Nevertheless, the ‘auto mode’ remains a valuable tool for capturing well-exposed and visually pleasing images in a wide range of scenarios, making photography more accessible and enjoyable for individuals at all skill levels.
Additionally, high levels of noise in printed images can result in reduced overall image quality and loss of fine details, making it important to strike a balance between ISO settings and the desired output quality when capturing photos for printing purposes.
In photography, ISO (International Organization for Standardization) represents the sensitivity of the camera’s sensor to light. As mentioned earlier, higher ISO settings make the sensor more sensitive to light, allowing you to capture images in low-light situations without needing slower shutter speeds or wider apertures. However, this increased sensitivity comes at a cost—higher ISO settings can introduce digital noise or graininess to the image, which can degrade its quality.
To achieve the best results, photographers strive to strike a balance between ISO, shutter speed, and aperture settings. Lower ISO values, such as ISO 100 or 200, are preferred when shooting in well-lit conditions, as they produce cleaner images with minimal noise. As the available light decreases, increasing the ISO can help maintain a proper exposure, but photographers must monitor the noise levels to prevent it from becoming excessive and affecting the overall image quality.
Modern cameras often offer a range of ISO settings, sometimes extending into the thousands or even tens of thousands. While these high ISO values can be useful for extremely low-light scenarios, they should be used judiciously to minimize noise. Additionally, advancements in camera technology have led to improved noise reduction algorithms, allowing photographers to achieve better results at higher ISO settings than in the past.
In summary, ISO is a crucial tool in photography that allows photographers to adapt to different lighting conditions. However, it’s essential to consider the trade-off between sensitivity and noise, as well as to use ISO in conjunction with other settings like shutter speed and aperture, to achieve the desired image quality for a given situation.
ISO speed
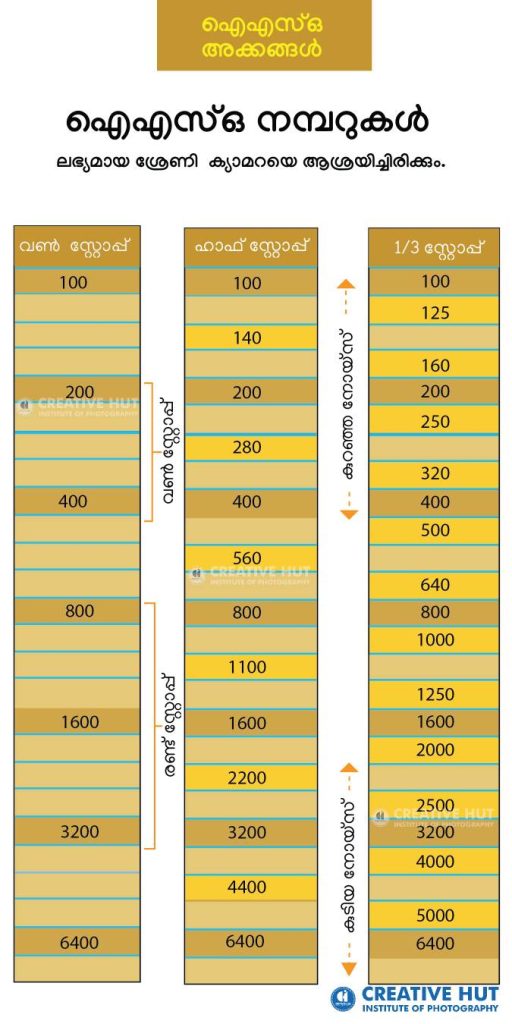
In the world of digital cameras, the ISO speed settings continue to be based on the same numbers like 50, 100, 200, 400, 800, 1600, and 3200. However, these ISO numbers can be further divided into three segments to provide more precise control over sensitivity to light. This allows photographers to adjust the ISO settings in smaller increments and achieve optimal exposure for their shots. This finer control is particularly useful in various lighting conditions and creative scenarios where maintaining the right balance between exposure and image quality is essential.
• One stop
• Half stop
• One third stop
One stop
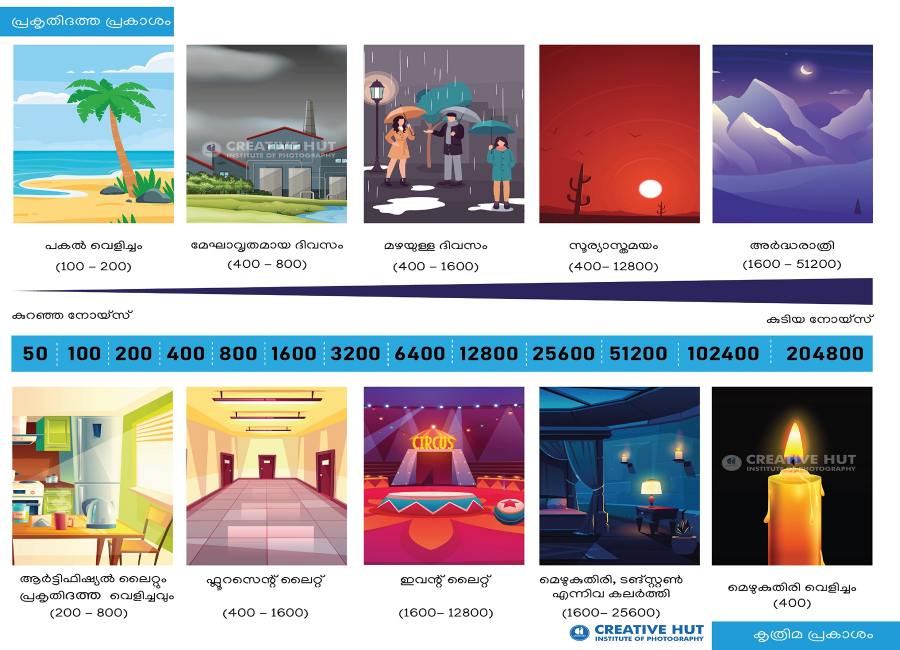
The term ISO, which stands for International Organization for Standardization, describes how sensitive the light sensor in your camera is. Using a low ISO setting, say 100, is good in well-lit environments like a sunny summer day because there is an excess of light available. This produces a clearer image with less noise, ensuring that minute details and vivid colors are faithfully recorded.
On the other side, less light is available on days that are cloudy or rainy. At this point, it may be advantageous to use a slightly higher ISO, such as 400. While boosting the ISO makes the camera more sensitive to light, it also increases the likelihood that the image will contain noise or grain. Modern cameras, however, frequently manage ISO 400 pretty well, establishing a compromise between collecting sufficient light.
In challenging lighting conditions, like a dimly lit room, you might need to set your ISO even higher, perhaps around 800 or more. This higher sensitivity allows your camera to gather enough light to properly expose the scene, but it can also lead to increased noise. To mitigate this, you might consider using a wider aperture (lower f-number) or a slower shutter speed if feasible, in combination with the higher ISO.
In summary, understanding how ISO interacts with light conditions is essential for achieving the desired exposure and image quality in various situations. Whether you’re basking in the summer sun, embracing a rainy ambiance, or navigating the shadows of indoor spaces, thoughtful ISO adjustments can significantly enhance the outcome of your photographs.

Conversely, if a photographer decides to decrease the exposure by 1 stop, it signifies that they will be capturing only half the amount of light compared to the previous shot. This concept of stops is crucial for achieving proper exposure and controlling the brightness of an image in photography.
Stop : 100, 200, 400, 800, 1600, 3200, 6400, 12800, 25600, 51200
In photography, increasing the ISO setting by one full stop doubles the sensitivity of the camera’s sensor to light, resulting in a brighter exposure. Conversely, decreasing the ISO setting by one full stop halves the sensitivity, leading to a darker exposure. This concept is crucial for controlling the exposure triangle, which includes ISO, aperture, and shutter speed, to achieve the desired balance of light and creative effects in photographs.
Understanding the concept of ISO in photography involves grasping the fundamental idea that each step in ISO value corresponds to a specific change in light sensitivity. When moving from ISO 100 to ISO 200, the light sensitivity of the film doubles, resulting in a one-stop increase. This means that the film becomes twice as receptive to light, allowing for faster shutter speeds or smaller apertures to maintain a balanced exposure. Likewise, as the ISO number doubles from 200 to 400, another one-stop change occurs. This progression signifies a continuous doubling of sensitivity, granting photographers greater flexibility in adjusting their settings to accommodate varying lighting conditions and creative preferences. Absolutely, you’ve got it right! When you increase the ISO value from, say, 200 to 400, you’re essentially doubling the sensitivity of your camera’s sensor to light. On the other hand, if you decrease the ISO by one stop from 400, you’re reducing the sensor’s sensitivity by half, resulting in a drop to an ISO of 200. This adjustment in ISO directly affects the brightness of your photos, making them either brighter or darker depending on whether you’re increasing or decreasing the ISO value
Experiment
When using multiple ISO settings to capture a subject, it is necessary to change the sensitivity of the sensor while maintaining adequate exposure using a variety of camera settings. The sensor’s sensitivity to light increases with increasing ISO, enabling shooting in low-light situations but perhaps adding noise. The shutter speed and aperture must be adjusted appropriately to provide consistent exposure. While a higher ISO would necessitate a slower shutter speed and a wider aperture in low-light conditions in order to retain the required exposure, a lower ISO can be used in conjunction with a faster shutter speed and a narrower aperture in well-lit conditions. In order to produce the highest image quality under a variety of lighting circumstances, the photographer must be able to balance ISO, shutter speed, and aperture settings. This approach ensures that the desired exposure level is maintained while exploring the creative possibilities offered by different ISO settings. By keeping the exposure settings consistent after compensating for the initial exposure meter inaccuracy, photographers can effectively observe the impact of changing ISO on factors like noise, dynamic range, and overall image quality. This controlled experimentation allows for a more comprehensive understanding of how ISO interacts with aperture and shutter speed, ultimately aiding in making informed decisions to achieve the desired photographic outcome.
Half stop
This finer level of adjustment is particularly useful in situations where the lighting conditions are not perfectly accommodated by the standard full stop increments. By offering a half stop option, photographers can make subtle changes to the exposure settings, ensuring that their photos are properly exposed without the need for drastic adjustments. This can be especially beneficial in scenarios with challenging lighting, such as capturing a scene with both bright highlights and deep shadows. Additionally, the ability to work with half stop increments grants photographers more creative freedom, enabling them to fine-tune their compositions with greater accuracy and achieve their desired artistic effects.
Half stop : 100, 140, 200, 280, 400, 560, 800, 1100, 1600, 2200, 3200, 4400, 6400, 8800, 12800, 17600, 25600, 35200, 51200
One third stop
In photography and cinematography, a “stop” refers to a standard unit of measurement for exposure, usually related to changes in aperture, shutter speed, or ISO sensitivity. A one-stop change doubles or halves the amount of light entering the camera, resulting in either a brighter or darker exposure. A third of a stop, also known as a “1/3 stop,” represents a smaller incremental adjustment that falls between the whole-stop values. For instance, let’s consider ISO sensitivity. If you have a camera with an ISO range of 100 to 200, a one-stop increase in ISO would move from 100 to 200 or decrease from 200 to 100. In contrast, a one-third stop adjustment would mean changing the ISO to 125 or 160. These fractional adjustments allow photographers and videographers to fine-tune their settings more precisely to achieve the desired exposure and creative effects. In summary, understanding stops and fractional stops is crucial for controlling exposure and achieving the desired look in photography and cinematography, as they provide a way to make incremental adjustments beyond the standard one-stop intervals.
One third stop : 100, 125, 160, 200, 250, 320, 400, 500, 640, 800, 1000, 1250, 1600, 2000, 2500, 3200, 4000, 5000, 6400, 8000, 10000, 12800, 16000, 20000, 25600, 32000, 40000, 51200
For example
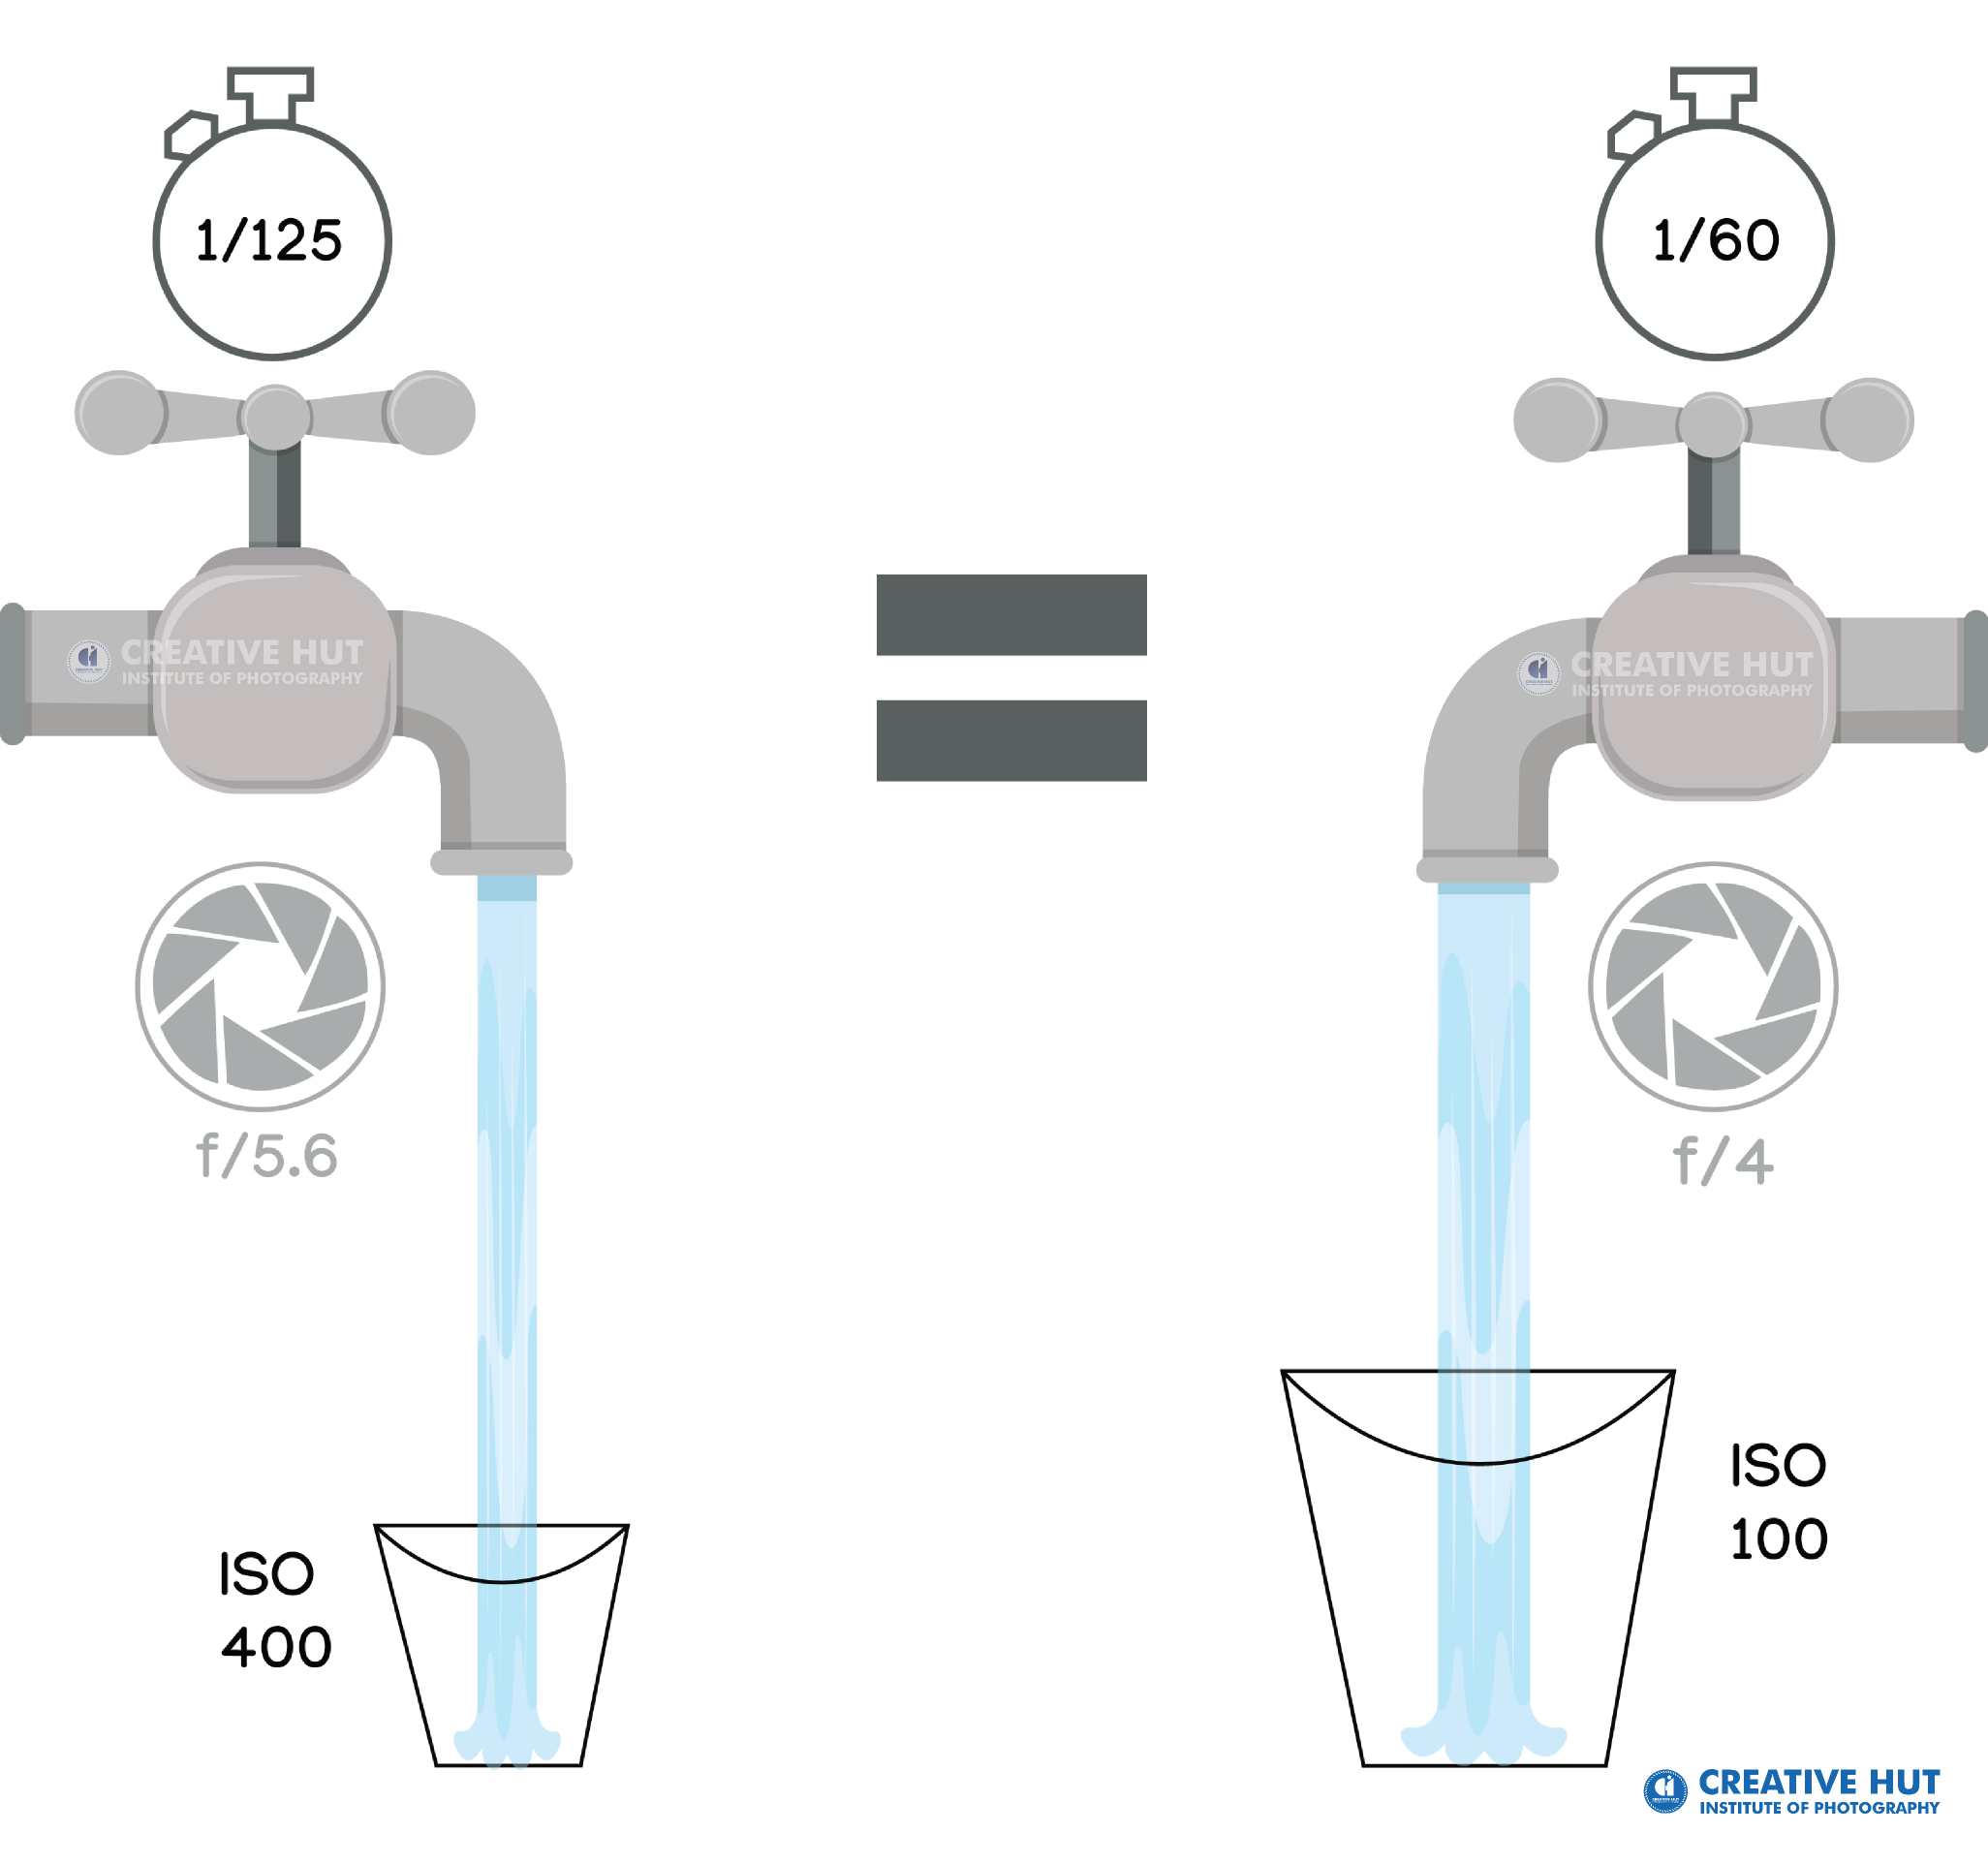
f/8 + 1/125 + ISO 400
f/11 + 1/125 + ISO 800
In both of these equations, the amount of light captured in the image will be equal. However, due to differences in sensor sensitivity or exposure settings, the second image will exhibit higher sensor brightness compared to the image taken in the first equation. Consequently, the second image is likely to display more pronounced graininess or noise than the first image.

Native ISO is better but it is difficult to always keep native ISO. Photography -Abin Alex | Camera: Canon 5D Mark IV, Focal length: 400mm, Aperture: f/5.6, Shutter speed: 1/400, ISO: 1600
It would be good to understand ISO first.
Native ISO
Amplified ISO
Simulated ISO
Native ISO
Higher ISO settings on a camera are obtained through electronic amplification of the sensor’s signal, as opposed to the native ISO and base ISO settings. The sensor’s sensitivity to light increases when the ISO number is raised, enabling the capture of photographs in low light. The finished image may have digital noise or graininess, which can lower image quality, especially in the darkest portions of the picture. When shooting in low-light conditions or when they need to use faster shutter speeds to freeze motion, photographers frequently pick higher ISO settings. It’s essential to strike the ideal balance between ISO, aperture, and shutter speed to get the correct exposure while preserving passable image quality. This native ISO setting represents the base sensitivity of the sensor, where the photoelectrons generated by the photons hitting the sensor are directly converted into digital values by the Analog-to-Digital Converter (ADC), without any additional amplification applied to the signal.
It is essential to choose a base ISO level that offers the highest image quality possible when poor light prevents achieving optimal image quality. The base ISO may, however, need to be changed when dealing with difficult lighting situations, such as low light conditions. As a general rule, think about setting your camera’s maximum ISO to be about one-fourth of its highest ISO rating. By using this method, it is possible to minimize the introduction of excessive noise while still getting an acceptable image. Furthermore, the size and technology of the camera’s sensor determine how much ISO affects image quality. The drawbacks of increased ISO may be partially offset in cameras with larger sensors and sophisticated noise reduction capabilities. There is still a trade-off between sensitivity and noise, despite these developments. In many cases, photographers must make a deliberate choice based on their artistic vision and the existing lighting conditions. Finding the ideal ratio of ISO, aperture, and shutter speed is essential for obtaining the best results with the least amount of image quality loss.
Amplified ISO
This variation in ISO settings directly impacts the final digital output of the image by adjusting the amplification applied to the analog signal captured by the camera sensor. Higher ISO values result in increased amplification, making the image appear brighter but potentially introducing more noise. Conversely, lower ISO values reduce amplification, yielding a darker image with potentially better noise performance. Cameras can automatically adjust the ISO based on lighting conditions, or users can manually set it to achieve their desired balance between brightness and image quality.
An ISO that magnifies the intended voltage at the sensor is called an amplified ISO.
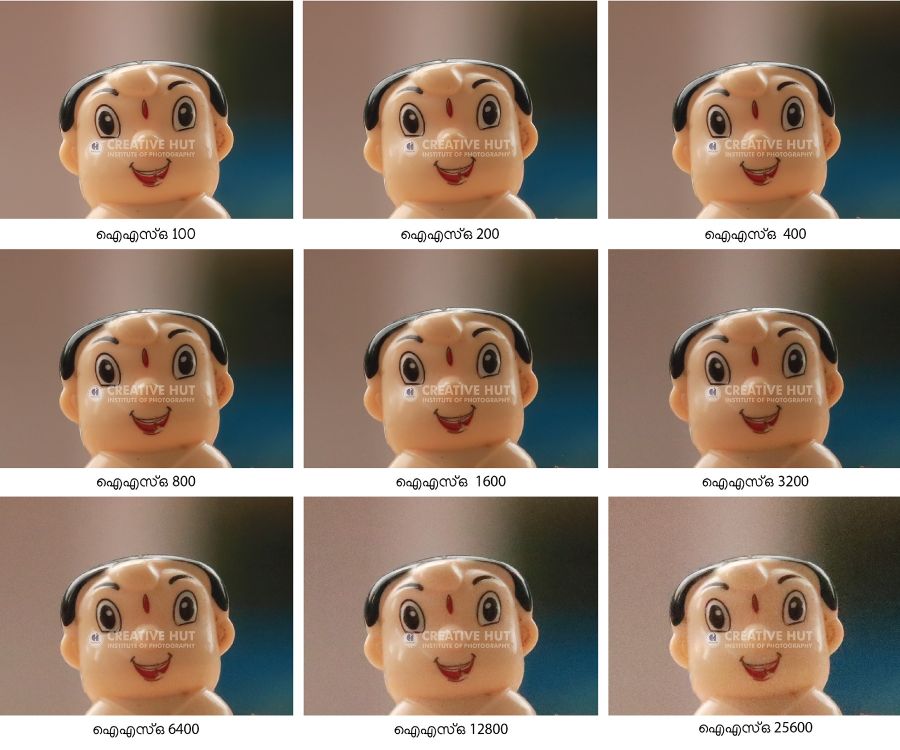
Low ISO, low noise
The higher the ISO, the more noise
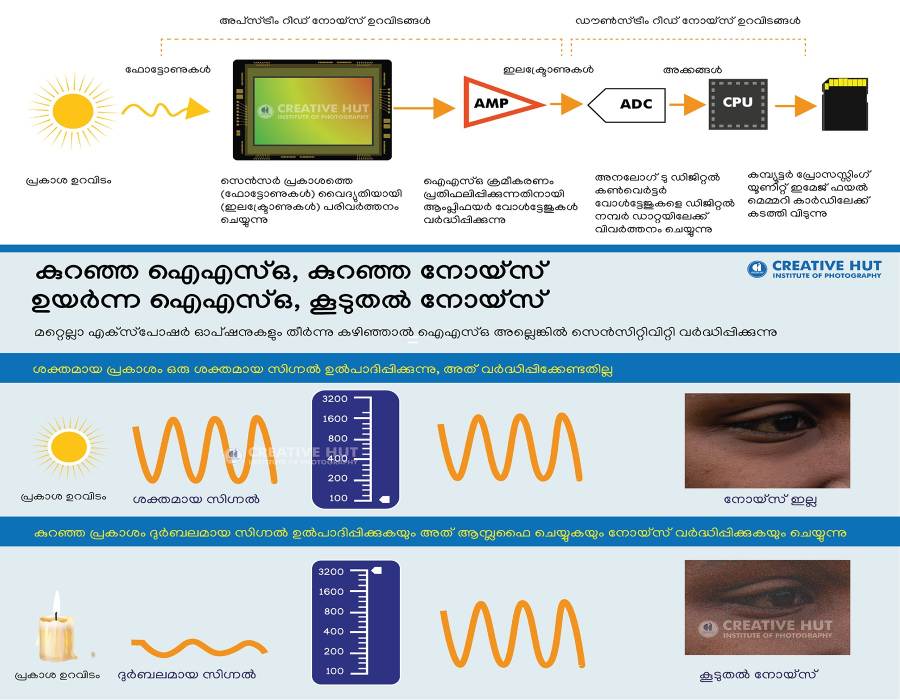
A camera’s sensor initially receives data in the form of minute electrical charges created by photons of light striking the sensor’s pixels. The various light levels in the scene being photographed are reflected in these fees. These charges, however, are normally quite weak and are easily masked by electronic noise generated by the circuitry of the camera and the sensor. These weak signals must be amplified before the picture data can be processed and viewed as a photograph. This method of amplification is comparable to turning up a sound’s volume to make it more audible. The “ISO” setting is the term used to describe this amplification in the context of photography. The camera’s sensor sensitivity can be altered by changing the ISO setting, which has an impact on how loud the electrical charges being recorded are amplified. The signal from the sensor is amplified more when the ISO setting is raised. When there is little light available, such as during low-light or nighttime shooting, this can be quite helpful. Even under difficult lighting circumstances, the camera can capture more light and produce a brighter image by boosting the ISO. Nevertheless, boosting the ISO setting comes with a cost. Higher ISO settings can improve exposure in low-light conditions, but they also frequently result in an increase in electronic noise and graininess. This is because any underlying electrical noise is magnified along with the desired signal charges. Consequently, photos taken at high ISO settings could have a lower level of image quality, such as a lower level of sharpness and color accuracy. In conclusion, changing the camera’s ISO level allows you to control how amplified the electrical charges produced by the sensor are. For the best overall image quality, it’s crucial for photographers to balance getting the right exposure with limiting the potential increase in noise, even though it can be advantageous in low-light settings.
Just as turning up the volume on a stereo amplifies both the desired sound and any underlying distortions, increasing the sensitivity of an image sensor magnifies the captured light signals along with any inherent electrical noise, impacting the overall quality of the captured image.
Speckle noise is a type of granular interference that arises from the random variation in pixel values caused by factors such as electrical fluctuations within the camera’s components or even external environmental influences. This noise pattern can obscure subtle details in the image and reduce the ability to discern meaningful information. To address this issue, various post-processing methods can be employed, such as filtering algorithms and noise reduction techniques. These methods attempt to preserve the important features of the image while suppressing the unwanted speckle noise, ultimately enhancing the reliability and interpretability of the captured data for analysis and decision-making purposes.
Simulated ISO
These simulated ISO settings provide photographers with greater flexibility in adjusting the sensitivity of the camera’s sensor without physically changing the hardware. When simulating higher ISOs, the camera’s algorithm amplifies the captured signal, which can lead to increased image noise but also permits shooting in low-light environments without sacrificing exposure. On the other hand, simulating lower ISOs involves reducing the sensitivity of the sensor through software, resulting in smoother and less noisy images, suitable for well-lit scenes. This digital manipulation of ISO settings is particularly useful when the desired physical ISO options are limited, allowing photographers to adapt to a wider range of shooting conditions and achieve optimal image quality.
How to Change ISO
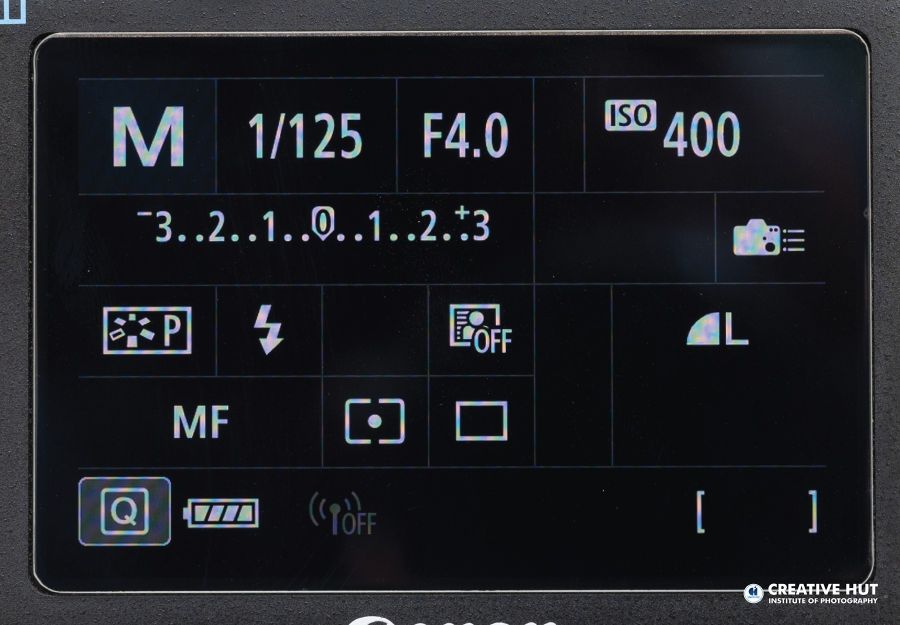
It’s often a good idea to use a more manual control choice when choosing which mode to employ when shooting a photo, such as Shutter Priority, Aperture Priority, or Manual Mode, in place of Auto Mode. Through the use of parameters like shutter speed and aperture, these modes provide you more artistic control over your photographs. While Auto Mode may be practical for quick pictures, it frequently restricts your ability to take more intricate and creative pictures. You may fine-tune settings using manual control, giving yourself the ability to alter exposure, motion blur, and depth of field in a way that Auto Mode cannot. Additionally, understanding how to use various modes and settings will substantially enhance your photographic abilities and aid in your comprehension of the basic principles underlying how your camera operates. It’s true that altering ISO settings might differ depending on the camera, but by managing noise and brightness, mastering ISO modifications can have a big impact on the quality of your photographs. In conclusion, spending some time experimenting and learning about Manual, Shutter Priority, Aperture Priority, or Program Mode can result in more personally fulfilling and visually appealing photos, thereby boosting your photographic experience.
In some advanced camera models, such as those used by professional photographers, the dedicated ISO button allows for quick access to the ISO settings. By simply rotating the camera’s wheels and pressing the designated ISO button, photographers can efficiently adjust the ISO value, enhancing their control over the camera’s sensitivity to light and ultimately optimizing the quality of their captured images.

Noise is not a problem, but how much can be solved. Photography -Abin Alex | | Camera: Canon 5D Mark IV, Focal Length: 100mm, Aperture: f/8, Shutter Speed: 1/200, ISO: 100
Having a dedicated wheel for ISO settings on certain cameras offers photographers a convenient way to quickly change their ISO values. This feature becomes especially useful when shooting in different lighting conditions or when aiming to achieve specific creative effects. By eliminating the need to navigate through menus, photographers can make swift adjustments on the fly, enhancing their overall shooting experience and ensuring they capture the desired shots with optimal exposure and minimal noise. Additionally, this intuitive design caters to both beginners and experienced photographers, making it easier for anyone to take full control of their camera settings and unleash their creativity.
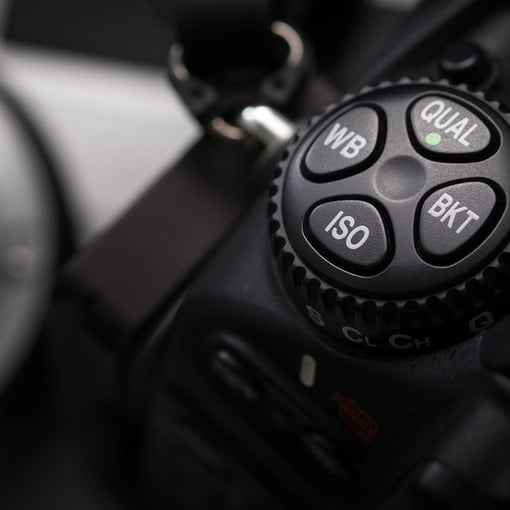
Absolutely, understanding the fundamentals of ISO settings is crucial for photography enthusiasts. The ability to quickly adjust ISO allows you to adapt to various shooting conditions. Different scenarios demand different ISO levels, and it becomes particularly vital when capturing images in low-light environments without the aid of a tripod or flash. This knowledge empowers you to maintain image quality while balancing exposure and noise, enhancing your overall photography skills.
In situations where ample light is available, opting for the camera’s lowest ISO setting, typically 100 or 200, is recommended to achieve optimal image quality with minimal noise. However, even in dim or dark environments, it’s advisable to experiment with the lowest feasible ISO setting to maintain image clarity while minimizing noise.
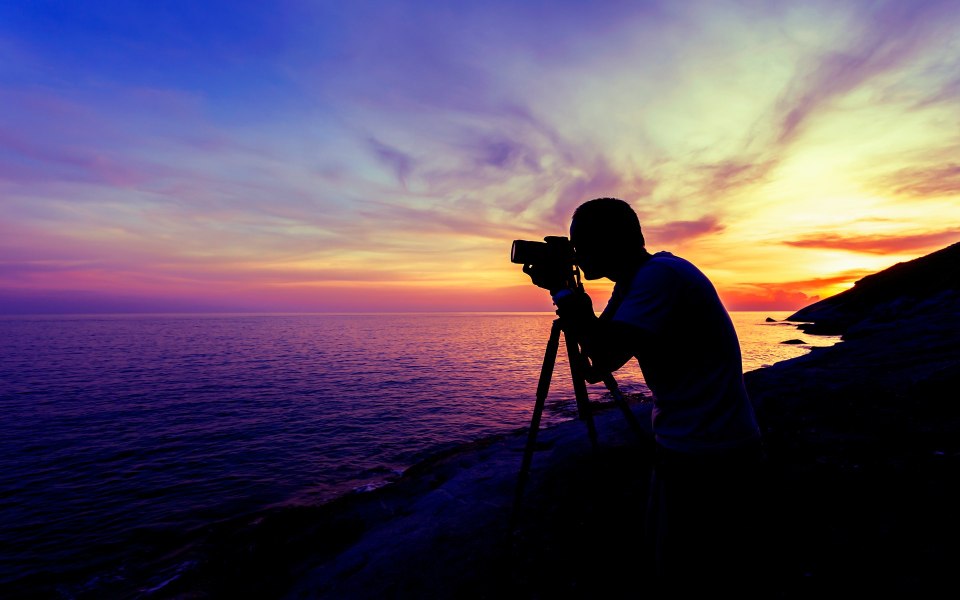

Absolutely, understanding the fundamentals of ISO is crucial for photographers. Being able to quickly adjust ISO settings allows you to adapt to various shooting conditions. Different scenarios demand different ISO values, and this becomes particularly critical when capturing images in low-light environments where a tripod or flash isn’t available. Controlling ISO helps you manage the balance between image brightness and potential noise, ensuring you can still achieve sharp and well-exposed shots even in challenging lighting situations.
In situations with ample lighting, it’s advisable to utilize the camera’s lowest ISO settings, such as the base ISO of 100 or 200, in order to maintain minimal noise in your photographs. Additionally, even in dim or dark settings, employing a low ISO whenever feasible can help you achieve clearer and higher quality images.
Furthermore, when employing a tripod or stable surface for your camera, you open up creative possibilities such as capturing stunning nightscapes or creating captivating light trails. This method allows for extended exposure times without introducing blurriness, making it ideal for landscape photography, astrophotography, and other low-light situations. By combining a lower ISO setting, longer shutter speed, and a controlled environment, you can achieve images with enhanced clarity, richer colors, and intricate details that might otherwise be lost due to camera shake or noise. Experimenting with these techniques can lead to impressive results and expand your photographic repertoire. In photography, using a long shutter speed can create interesting effects like capturing the movement of multiple subjects in a single image, resulting in a visual representation that might resemble shaky ghosts due to the blurred and stretched appearance of the moving objects.
To mitigate the noise and graininess associated with high ISO settings, photographers often employ techniques such as using a wider aperture to let in more light, slowing down the shutter speed while using a stable support like a tripod, and utilizing image stabilization technology. Additionally, advancements in camera technology have led to improved noise reduction algorithms, which can help minimize the negative effects of high ISO settings on the final image. Balancing the need for light sensitivity with the quality of the resulting image is a delicate trade-off that photographers must consider to achieve the desired outcome when capturing moving subjects in low-light environments.

Experiment
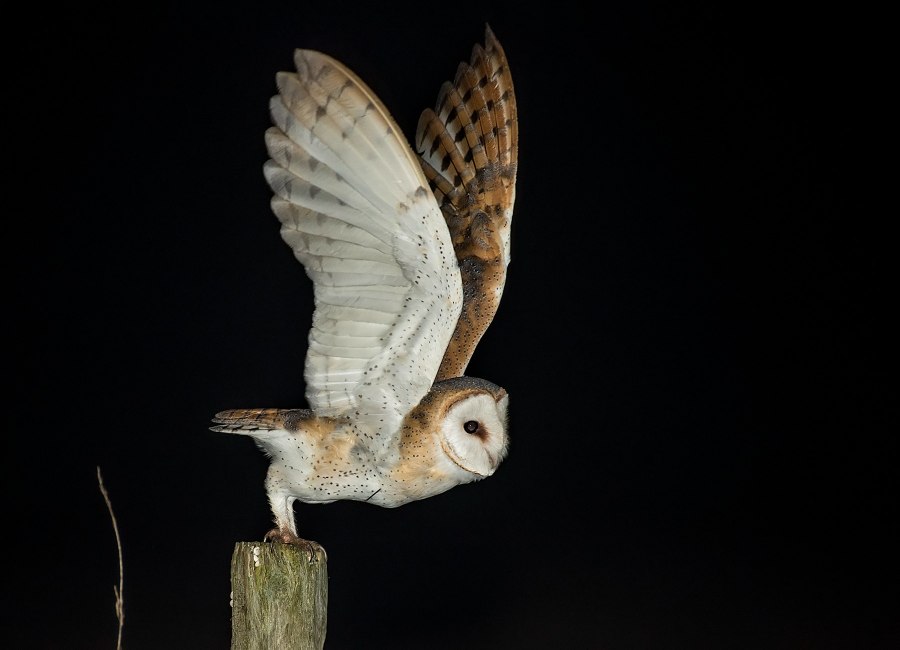
Utilizing an extended shutter speed is recommended when capturing a dimly lit subject like the one depicted in the image, particularly during low-light conditions, as it enables the camera to gather more light and reveal the finer details of the scene. To achieve the desired exposure, please ensure that the shutter remains open for the entire 30-second duration while the subject is in place. Additionally, remember to make necessary adjustments to the aperture, ISO, and other relevant parameters. Feel free to set the shutter speed to 30 seconds and test the configuration.
to consider is that using a high ISO can introduce digital noise or graininess to the image, potentially reducing the overall image quality. Therefore, finding the right balance between a high enough ISO to achieve a fast shutter speed and minimizing noise becomes crucial for capturing sharp and clean images of flying birds in low light conditions.
Increasing the ISO sensitivity allows the camera sensor to amplify the available light, which helps capture a properly exposed image even in low-light conditions. However, using a high ISO setting can introduce noise or graininess to the photo, so it’s important to find a balance between getting enough light and maintaining image quality. When shooting handheld without a flash, raising the ISO can indeed be beneficial to avoid motion blur and capture sharper photos, but finding the right ISO value to strike that balance is key to achieving the best results.
Additionally, while increasing the ISO can help capture fast-moving subjects in challenging lighting conditions, it’s important to be mindful of the potential trade-offs. Higher ISO settings can introduce digital noise and reduce overall image quality. Therefore, finding a balance between ISO, shutter speed, and aperture settings is crucial to achieve both a well-exposed image and the desired level of sharpness and clarity.
When you venture beyond the native ISO range of your camera and utilize the simulated “HI” (high) or “LO” (low) values, you essentially manipulate the sensor sensitivity artificially. While this might provide some flexibility in challenging lighting conditions, it often comes at the cost of increased noise, reduced dynamic range, and potential loss of fine details in your images. These simulated ISO values can introduce artifacts, such as color shifts, graininess, and decreased sharpness, ultimately compromising the overall image quality. To ensure your photographs maintain the highest level of clarity and fidelity, it’s recommended to exercise caution and avoid straying from the camera’s native ISO range whenever possible.
Tip thing
Furthermore, adhering to the principle of not exceeding the highest ISO divided by 4 ensures that your images retain crucial details and exhibit a more natural tone. Pushing beyond this limit may introduce unwanted artifacts and a noticeable loss of clarity, diminishing the overall visual appeal of your photographs. By embracing ISO settings within this calculated range, you strike a balance between capturing striking shots and upholding the integrity of your images, resulting in a portfolio that impresses both viewers and fellow photographers alike.
Noise
A typical challenge in photography, especially in low light situations, is reducing noise or grain in photographs created by a camera’s operational settings. The quality of the image is in fact greatly influenced by the signal-to-noise ratio (SNR), with higher SNR indicating a clearer and less cluttered image. Here are some methods you can employ to raise SNR and lower noise: Use Lower ISO Settings: Higher ISO settings boost the signal coming from the camera’s sensor, but they also boost noise. Lower ISO settings, particularly in well-lit environments, can assist cut down on noise. Optimal Exposure: Noise reduction can be significantly impacted by how well your shot is exposed. When an image is underexposed and subsequently brightened in post-processing, noise can grow. In camera, try to get a balanced exposure. Use Wider Apertures: By letting in more light through wider apertures (lower f-stop values), you can use lower ISO settings and cut down on noise. Keep in mind that deeper depth of field is produced by wider apertures. Longer shutter speeds: When the lighting is good, employing longer shutter speeds can help capture more light and allow for the use of lower ISO settings. To prevent motion blur, this technique might need a tripod. Having image stabilization (IS/VR) on your camera or lens can assist minimize camera shake and allow you to use slower shutter speeds without creating blur. Shoot with RAW: Compared to JPEG files, RAW files preserve more image data and offer better noise reduction during post-processing. RAW files provide you more control over how the noise reduction parameters are adjusted. Noise reduction features are available in a variety of photo editing software programs. With the use of these tools, you may carefully minimize noise without losing any image detail. Be careful not to overuse it, too, as doing so can result in a loss of sharpness. Utilize Specialized Software for Noise Reduction: Tools for noise reduction exist, such Topaz De Noise and D x O Photo Lab. These instruments can provide sophisticated noise reduction techniques. Shoot in Well-Lit Conditions: The less you need to amplify the signal with high ISO settings, which in turn minimizes noise, the more light there is. This can be accomplished by using external lighting sources or by taking photos during the golden hour. Equipment upgrade: Newer cameras frequently feature improved sensor technology, allowing them to operate at higher ISO settings with less noise. It might be advantageous to upgrade to a newer camera model if noise reduction is a key concern. Although these methods can assist reduce noise, it’s important to keep in mind that some noise will always be there, especially in low-light conditions. For outcomes to be aesthetically pleasing, noise reduction and keeping image details must be balanced.
In addition to the physical processes involved in capturing an image, there are other factors that can contribute to noise as well. One such factor is the temperature of the camera’s sensor. Higher temperatures can increase the amount of random thermal noise present in the image. This is especially noticeable in long exposure shots or when the camera’s sensor is continuously active.
Another consideration is the quality of the camera’s sensor and its electronics. Lower quality sensors or outdated technology might introduce more noise due to limitations in their design and manufacturing processes. Modern cameras often incorporate noise reduction algorithms to mitigate some of these effects during image processing, but these algorithms can also impact image sharpness and detail.
Furthermore, the choice of file format and compression settings when saving the image can influence the amount of noise in the final result. Lossy compression methods, which discard some image data to reduce file size, can sometimes amplify noise and decrease image quality.
Ultimately, managing and minimizing noise requires a balance between various factors, including camera settings, equipment quality, environmental conditions, and post-processing techniques. Photographers and image processors must carefully consider these elements to achieve the desired level of image quality while controlling the presence of noise.

Photography is not about taking a picture without noise, but about taking a picture with less noise. Photography -Abin Alex | | Camera: Canon 5D Mark IV, Focal Length: 100mm, Aperture: f/2.8, Shutter Speed: 1/60, ISO: 1000
Indeed, understanding the sources and effects of noise in digital images is crucial for anyone involved in photography, image processing, or working with digital imaging devices. There are two primary types of noise that can affect the quality of an image: random noise and fixed-pattern noise.
Random Noise:
Random noise is also known as statistical noise or Gaussian noise. It appears as variations in pixel values that are not directly related to the actual scene being captured. This type of noise is caused by the inherent randomness in the behavior of light particles (photons) as they strike the camera’s sensor. Factors that contribute to random noise include:
Photon Shot Noise: This is the fundamental noise that results from the statistical nature of light hitting the sensor. It creates pixel-to-pixel variations in brightness due to the discrete nature of photons.
Thermal Noise: Also called dark current noise, this arises from the random movement of electrons within the sensor’s semiconductor material, even in the absence of light. It becomes more noticeable in longer exposure times or at higher temperatures.
Read Noise: This noise occurs during the process of converting the electrical signal from the sensor into a digital value. It’s a constant noise added to the signal due to the sensor’s electronics and analog-to-digital conversion.
Fixed-Pattern Noise:
Fixed-pattern noise appears as a pattern of consistent variations in pixel values across the image. It is caused by imperfections or inconsistencies in the sensor’s manufacturing process, electronics, or signal amplification. Fixed-pattern noise is relatively consistent from image to image, which makes it more predictable and easier to correct through calibration or post-processing.
Row Noise: This type of fixed-pattern noise is caused by variations in sensitivity among rows of pixels in the sensor. It can create noticeable horizontal stripes in the image.
Column Noise: Similar to row noise, column noise results from sensitivity variations among columns of pixels, causing vertical streaks in the image.
Pixel-to-Pixel Variations: Manufacturing variations in individual pixels can lead to small but noticeable differences in their responses to light, resulting in a fine grainy pattern across the image.
Amplifier Noise: Variability in the performance of the sensor’s amplifiers can introduce noise patterns that are consistent in specific regions of the image.
reducing noise
Utilizing Lower ISO Settings: Lower ISO settings lead to less signal amplification and can cut down on noise.
Shorter Exposure Times: Shortening the exposure duration helps prevent thermal noise from building up.
Noise Reduction Algorithms: Both post-processing software and many cameras contain noise reduction capabilities that can assist reduce both random and fixed-pattern noise.
Cooling: To cut down on thermal noise during longer exposures, professional cameras may feature cooling devices.
Improved manufacturing techniques and sensor technology can lessen noise with set patterns.In summary, a combination of factors related to the behavior of light, sensor characteristics, and electronic processes contribute to the types of noise observed in digital images. Understanding these factors helps photographers and image processors to make informed decisions and apply appropriate techniques to minimize noise and improve image quality.
Dark Noise
Photon shot noise
Electronic read noise
Dark Noise
It’s important to note that dark noise primarily stems from thermal and electronic fluctuations within the sensor itself, rather than being solely determined by the supply voltage or the reverse bias voltage applied to the photodiodes. While the supply voltage does play a role in enabling the sensor’s operation and signal detection, dark noise arises from the inherent randomness of these fluctuations, leading to small phantom currents that can occur even under reverse bias conditions.
Furthermore, the presence of dark noise due to thermal radiation in a photodiode’s output signal can impact the overall image quality, potentially leading to increased noise levels and reduced clarity in the captured images. As a result, careful consideration of temperature management and noise reduction techniques is essential in designing and operating sensitive imaging systems.
Photon shot noise
Photon shot noise, also known as Poisson noise, emerges due to the probabilistic nature of light. In areas of an image where fewer photons are captured, such as darker regions, the randomness in photon arrival leads to more noticeable fluctuations, resulting in a grainy appearance. Brighter areas, on the other hand, tend to have a larger number of photons, which reduces the relative impact of these random fluctuations, making the noise less pronounced. As a result, photon shot noise is a fundamental component of the noise present in images, particularly in low-light conditions, and contributes to the natural grain-like texture that is often observed.
In the context of imaging, photon shot noise arises due to the discrete nature of light particles (photons). It leads to variations in the number of photons detected by a sensor in a given period of time, causing random fluctuations in the captured signal. As a consequence, images taken in low-light conditions tend to exhibit higher levels of photon shot noise, resulting in a lower signal-to-noise ratio. Increasing the amount of light during image capture can help mitigate this noise by providing a stronger and more consistent signal, thus improving the overall quality of the image.
Electronic read noise
Downstream read noise, on the other hand, refers to noise that occurs during the digitization process, typically introduced during analog-to-digital conversion and subsequent digital processing stages. Both upstream and downstream read noise can impact the overall quality and accuracy of electronic signal processing in various electronic systems and devices. To mitigate these noise sources, various techniques are employed in sensor design and image processing. Cooling mechanisms can be implemented to reduce thermal noise, while advanced sensor architectures and manufacturing processes can help minimize reset noise and pixel amplifier noise. Additionally, post-processing algorithms like noise reduction filters can be applied to suppress noise after image capture, striking a balance between noise reduction and preserving image details. As sensor technology continues to advance, efforts are being made to enhance the signal-to-noise ratio at the sensor level itself, leading to improved image quality even before ISO amplification.
The quality of the signal being processed as a whole may be significantly impacted by this downstream read noise. Unwanted changes and fluctuations may be introduced, obscuring the genuine underlying data. The precision and fidelity of the output could be impacted by these flaws in the analog-to-digital converter that could result in errors in the digital representation of the analog signal. Therefore, in applications where high-quality signal processing is vital, such as in scientific measurements, medical imaging, and communication systems, it is crucial to minimize and manage downstream read noise. The analog and digital system components must frequently be carefully engineered in order to minimize these abnormalities. Additionally, modern noise reduction techniques must be used in order to improve the signal-to-noise ratio and guarantee proper data interpretation.
In the realm of digital imaging and sensor technology, the phenomenon of reset noise holds notable significance. This particular form of noise arises due to inherent inconsistencies in the voltages used during the critical pixel reset phase of an imaging sensor. As each pixel prepares to capture new data, it must first be reset to a baseline state. However, minor voltage fluctuations that occur during this resetting process can lead to irregularities in the initial charge level of individual pixels. Consequently, when the subsequent charge corresponding to incoming light is read and processed, these minute deviations in the initial state can culminate in discernible variations in pixel intensity. This ripple effect of brightness alterations tends to traverse across adjacent pixels, potentially impacting the overall image quality by introducing a subtle yet perceptible granularity. As imaging technology continues to advance, efforts to mitigate reset noise and refine pixel reset mechanisms remain key focal points for enhancing the fidelity and clarity of digital images.

Sometimes images with noise also add charm to the eye. Photography – Abin Alex. | Camera : Canon 5D Mark IV, Focal Length : 100mm, Aperture : f/11, Shutter Speed : 1/125s, ISO : 400
In spite of its purpose, correlated double sampling (CDS) fails to achieve its intended mitigation effects. This is due to its inability to effectively subtract the voltage obtained after reset from the voltage during exposure at each pixel. As a consequence, a persistent non-zero noise factor remains present in the system.
In essence, downstream read noise encompasses various sources of electronic interference and distortion that accumulate as a signal travels through a camera’s components, starting from ISO amplification and extending through the subsequent stages of processing, such as analog-to-digital conversion, and the interconnected pathways between these elements.
Upstream read noise, which originates during the initial pixel contribution process, can have a significant impact on the quality of the captured signal. This noise arises from various sources within the image sensor and the readout circuitry, such as thermal fluctuations and electronic components’ imperfections. These subtle variations can introduce unwanted distortions into the signal, potentially degrading image clarity and overall quality.
On the other hand, downstream read noise encompasses all the processes that come into play after ISO amplification. This includes tasks such as analog-to-digital conversion, signal processing, and image compression. While these downstream processes are crucial for refining and preparing the captured data for storage or further manipulation, they can also introduce additional noise due to the inherent limitations of electronic components and the complexities of signal processing algorithms.
In photography and digital imaging, managing both upstream and downstream read noise is essential for producing high-quality images. Techniques such as noise reduction algorithms and advanced sensor designs aim to mitigate the negative effects of these noise sources, enhancing the final visual output and ensuring that the intended content remains clear and accurate.
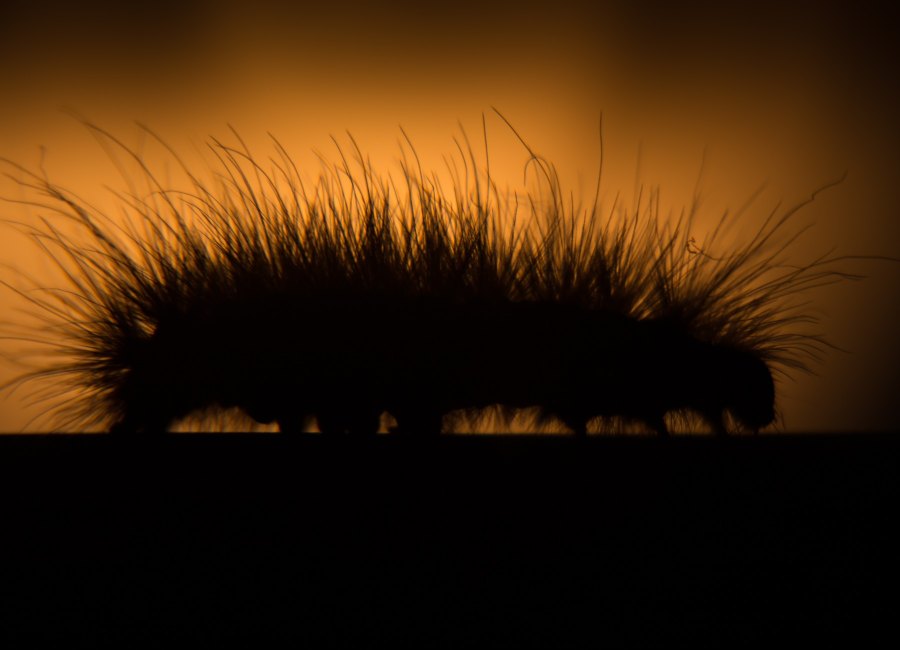
Noise is more likely when capturing dimly lit subjects. Photography – Abin Alex | Camera: Canon 6D Mark IV, Focal length: 105mm, Aperture: f/4, Shutter speed: 1/100sec. , ISO:100


