Abstract
A guide to the storyboard: a picture of every planned shot, drawn in order like a comic strip, with notes on action, dialogue and camera. It shows where the storyboard sits between the screenplay and the shoot, what each panel must carry, the arrows that show camera and character movement, and a step by step method for drawing one, including photo and AI generated storyboards.
Keywords: storyboard, what is a storyboard, how to make a storyboard, storyboard panel, shot size, camera movement arrows, thumbnail storyboard, animatic, AI storyboard, pre-production
What is a storyboard?
Short answer. A storyboard is a series of panels, one for each shot, with a drawing or picture and notes on the action, dialogue and camera. It is the comic book version of your script.
Definition and purpose
A storyboard is a sequence of drawings or images, one for each planned shot, with notes on what happens, what is said and how the camera works. It shows how the film will look before anything is shot (Hart, 2008).
- Each square, or panel, shows one shot.
- Under or beside the picture: the action, the dialogue and shot details.
- Arrows show how the camera or the characters move.
- The director uses it to explain the film to the cinematographer, actors and crew.
- Problems found on paper, such as a missing shot, a confusing direction or a set that cannot be built, cost nothing to fix.
You do not need to draw well. Stick figures with clear frames and clear arrows work better than beautiful drawings that hide the camera’s position.
- Choose a 30 second scene from a film.
- Pause on each new shot and sketch it in a box.
- Count the shots; that is how many panels the scene needed.
Where the storyboard fits
The storyboard comes after the story, screenplay and shot division, and before the shoot. It turns the written shot list into pictures that the whole crew can read in the same way.
- Story
- Character biography
- Location details
- Scene division
- Screenplay
- Shot division
- Storyboard
- Cinematography (the shoot)
- Editing
- The finished short film
Do the shot division before you draw. Drawing first tempts you into beautiful frames that do not cut together.
- Write the ten steps above on one page.
- Tick the steps you have finished for your film.
- Plan the date for the next unticked step.
For a 3 minute film of about 25 shots, the storyboard fits on four A4 sheets of six panels each.
Action and visual effects sequences are boarded shot by shot; quiet dialogue scenes may only get a few key frames.
What goes into a storyboard panel?
Short answer. A panel holds the frame, drawn in the film’s aspect ratio, and the shot’s details: scene and shot number, shot size, action, dialogue and camera movement.
The frame
The frame is the picture area of a panel, drawn in the same aspect ratio as the finished film, so you plan exactly what the camera will see and what it will leave out.
- Draw the box in your film’s aspect ratio: 16:9 for most video, 2.39:1 for a wide cinema look, 9:16 for vertical social video.
- Draw the horizon and the main subject first, then the background.
- Show the shot size clearly: a close-up fills the frame with a face; a wide shot shows the whole place.
- Use a drawing, a sketch, a reference image, a photograph or an AI generated frame.
Draw the frame edges before anything else. Most weak storyboards are weak because the edges were added last and cut the subject badly.
- Print or draw six empty frames in your film’s aspect ratio.
- Sketch the first six shots of your scene inside them.
- Check each shot size is easy to read at a glance.
Panel information
Every panel carries written details so that the crew can read the shot without the director in the room: which film, which scene and shot, how big the shot is, what happens and what is said.
Write the fields in Table 1 beside or below each frame.
| Field | Example |
|---|---|
| Name of the film | The Last Bus |
| Page number | Page 3 |
| Scene number | Scene 12 |
| Shot number | Shot 12C |
| Shot size and lens | Close-up, 85mm |
| Action | Anu looks up as the bus passes |
| Dialogue | ANU: That was the last one. |
| Camera movement | Slow push in |
Number shots inside a scene with letters: 12A, 12B, 12C. If a shot is added later, call it 12BA; you never have to renumber.
- Add the eight fields to each of your six frames.
- Number the shots with letters.
- Hand the sheet to a friend and ask them to describe the scene back.
A student short can use phone photos of friends standing in for actors as the frames.
A professional storyboard artist draws detailed panels for stunts, so the stunt team can rehearse each move.
How do you show camera and character movement?
Short answer. Arrows drawn on or beside the frame show how the camera moves (pan, tilt, zoom, track, rotate) and how characters move within the shot.
Movement arrows
Storyboard arrows are simple symbols that show movement. One kind shows the camera moving; another shows a character or object moving inside the frame (Katz, 1991).
- Pan right or left: a horizontal arrow across the frame; the camera turns on its base.
- Tilt up or down: a vertical arrow; the camera points up or down.
- Zoom in: four arrows from the corners pointing inwards to a smaller box, the final frame.
- Zoom out: four arrows pointing outwards from a small box.
- Rotate: a curved arrow.
- Track or dolly: an arrow outside the frame showing the camera’s path.
- Character movement: an arrow in a different colour from the character’s start to end point.
- For a long move, draw the start frame and end frame and join them with an arrow.
Use one colour for camera arrows and another for character arrows on every board. The crew learns the code once.
- Pick three of your panels.
- Add a camera arrow to each, in one colour.
- Add a character arrow to one, in another colour.
A single slow push in on a face, drawn as zoom-in arrows, can carry the turning point of a 2 minute film.
A long tracking shot through a wedding is boarded as a floor plan with the camera path drawn as one arrow.
How do you make a storyboard, step by step?
Short answer. Start from the shot division, draw quick thumbnails, refine the key frames, add details and arrows, then check that the shots cut together before the shoot.
Step by step
Making a storyboard means turning each line of the shot division into a numbered panel, starting with rough thumbnails and refining only once the order and coverage are right.
- Read the scene and its shot division.
- Draw thumbnails: small rough boxes, one per shot, in minutes, not hours.
- Check the order: does each shot lead to the next? Is anything missing?
- Check the 180 degree line: keep the camera on one side of the action so characters keep facing the same way.
- Refine the key frames at full size.
- Add details and arrows to every panel.
- Walk through it with the cinematographer and first assistant director.
Hold the thumbnails up in order and "play" them while saying the dialogue aloud. If you stumble, the cut will too.
- Draw thumbnails for one scene in ten minutes.
- Check the 180 degree line in every shot.
- Refine three key frames at full size.
Types of storyboard
Storyboards range from quick sketches to moving previews. Choose the type by the scene’s difficulty and the time you have.
Table 2 compares five common types.
| Type | What it is | Best for |
|---|---|---|
| Thumbnail | Small rough sketches | Planning order and coverage fast |
| Illustrated | Detailed drawn panels | Action, stunts, effects |
| Photo | Photos of stand-ins on location | Student films, real locations |
| Animatic | Panels cut to time with sound | Timing, animation, adverts |
| AI generated | Frames made with an image model from a written shot prompt | Fast previs, look testing |
For an AI storyboard, keep a fixed character description, location description and style line for the whole film, and paste them into every shot’s prompt. That keeps faces and colours consistent from panel to panel.
- Choose a type for your scene from Table 2.
- Make three panels in that type.
- Note how long it took, to plan the rest.
Students at Creative Hut make AI storyboards from their shot division, then shoot or generate the film from the same frames.
Large productions build animatics, and for effects-heavy scenes, 3D previsualisation, before the shoot.
What does the One Cloud storyboard look like?
Short answer. We take the dock scene of the short film One Cloud, draw it as a thumbnail storyboard, compare the six formats it can take, and build AI frames with locked prompts in ChatGPT or any image model.
The thumbnail board
A thumbnail board is the fastest storyboard: small frames with stick figures, drawn straight from the shot division. It is for thinking, not for showing, so speed matters more than drawing skill.
- Start from the shot division of the dock scene.
- Draw one frame per shot in the film’s aspect ratio, here 2.39:1.
- Show size by how big the figure is: tiny for an extreme long shot, a face for a close-up.
- Add arrows for movement and write shot number and time below.
Draw in pen, not pencil. You will not stop to erase, and a thumbnail board should take minutes, not hours.
- Draw six thumbnail frames for one scene of your film.
- Show shot size by figure size only.
- Add arrows and shot numbers.
Six storyboard formats
The same storyboard can be made in different formats, from rough thumbnails to a timed animatic. The right one depends on who will read it and how much time and money you have.
- Use thumbnails for yourself, clean boards for the crew.
- Use illustrated colour boards when a client must approve the look.
- Use a photo board when you can reach the location early.
- Use AI frames to preview mood and lenses fast.
- Cut an animatic to test timing before you shoot.
| Format | What it looks like | Who uses it | Time for scene 5 |
|---|---|---|---|
| Thumbnail sketch | Stick figures in small boxes, as in Figure 1 | Director, for thinking | About 20 minutes |
| Clean line board | Neat pencil or digital line art with arrows and shot info | Crew on a short film or series | About half a day |
| Illustrated colour board | Full colour drawings with light and mood | Advertising agencies and clients | Two to three days |
| Photo board | Stand-ins photographed on the real dock with a phone | Low budget shoots, location tests | About two hours |
| AI frame board | Frames made in an image model from fixed prompts | AI films, pitches, quick previews | About an hour |
| Animatic | Frames cut to time with temp sound and music | Editors, animators, VFX teams | About half a day |
Pick one format per job. Mixing sketches and AI frames on the same board confuses the crew about what the shot should look like.
- Choose a format for your next film and write why.
- Make a photo board of three shots with friends as stand-ins.
- Cut those three photos to time on your phone as an animatic.
AI frames with ChatGPT and image models
An AI frame board uses an image model, such as ChatGPT image generation, to make each storyboard frame from a written prompt. The secret is consistency: the same locked description of each character, place and style is pasted into every prompt.
- Write the locked lines once, as in Table 2.
- Build each shot prompt: style, shot size and angle, place, who is in frame and what they do.
- Ask for the film’s aspect ratio and no text in the image.
- Generate, pick the closest frame, and only then fix details with a short follow-up.
- Lay the frames out with shot number, size and time under each.
- Image models may refuse realistic frames of a child character. For One Cloud, a drawn pencil and wash style was accepted, and suits a storyboard anyway.
| ID | Locked description |
|---|---|
| Style | Cinematic still, 2.39:1, soft dawn light, teal grey sea and warm orange sun, light mist, 35mm film grain, realistic, no text |
| Meenu | 12 year old Indian girl from Keralam, short messy black hair, oil marks on fingers, faded yellow raincoat over a grey T shirt, determined eyes |
| Appu | 78 year old Indian man, former fisherman, thin, white stubble, white mundu and pale blue shirt, a paper boat in his shirt pocket |
| Rani | 40 year old Indian woman, weather patrol officer, navy uniform with a reflective band, short hair, handheld scanner |
| Kunju | Small dented scrap weather drone, four rotors, a taped sprayer nozzle, chipped white and orange paint |
| Ferry dock | Floating city dock in Kochi, 2047, steel railings, a white electric ferry, solar towers behind, calm water |
Prompt for shot 5.5
[Style]. Wide shot from the land side of the [Ferry dock] at dawn. [Meenu] stands on the railing holding a home made rig of a sprayer, a fan and a hose; a clumsy mist rises from it and catches the low sun. [Appu] stands to the right with one bag, small in frame. The ferry waits behind in the mist.
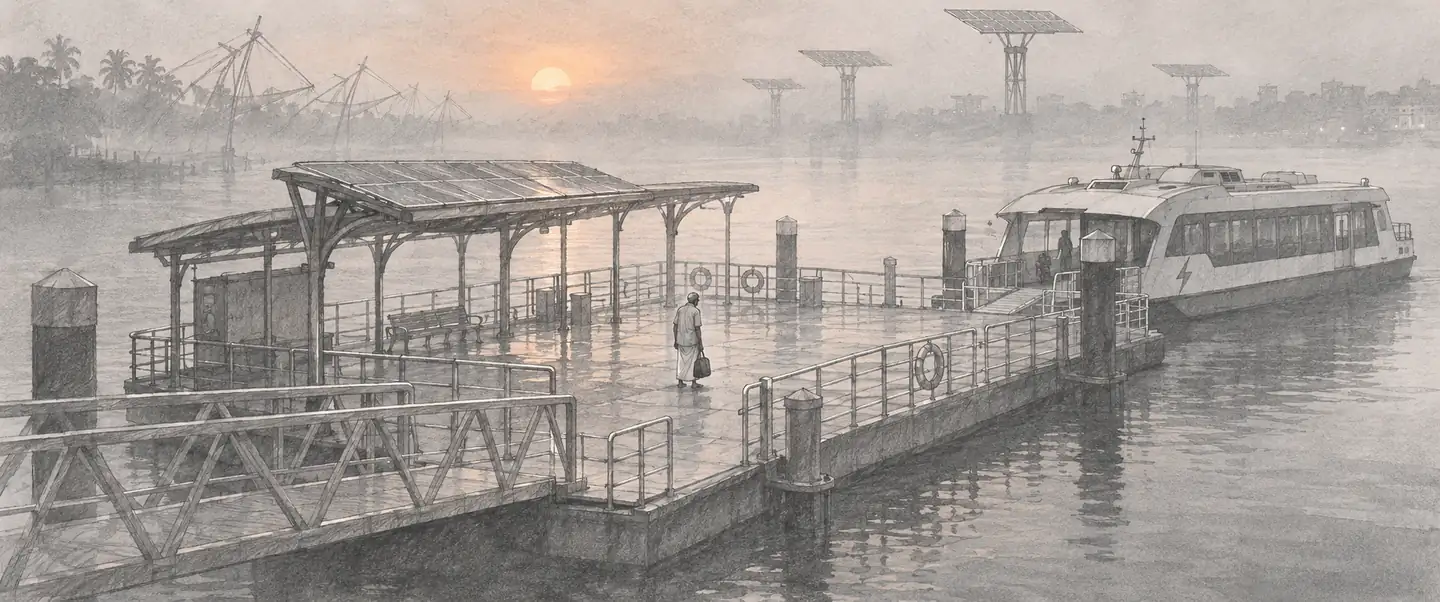
5.1 · Extreme long shot, high angle · Static, 24mm · 5s
The dock in dawn mist, the ferry waiting, Appu small with one bag

5.2 · Medium shot · Handheld track, 35mm · 4s
Meenu runs in with the sprayer, fan and hose rig

5.3 · Close-up insert · Static, 50mm · 2s
Her hands tape the hose and press the switch

5.4 · Medium long shot, low angle · Tilt up, 35mm · 4s
She lifts the rig over the railing
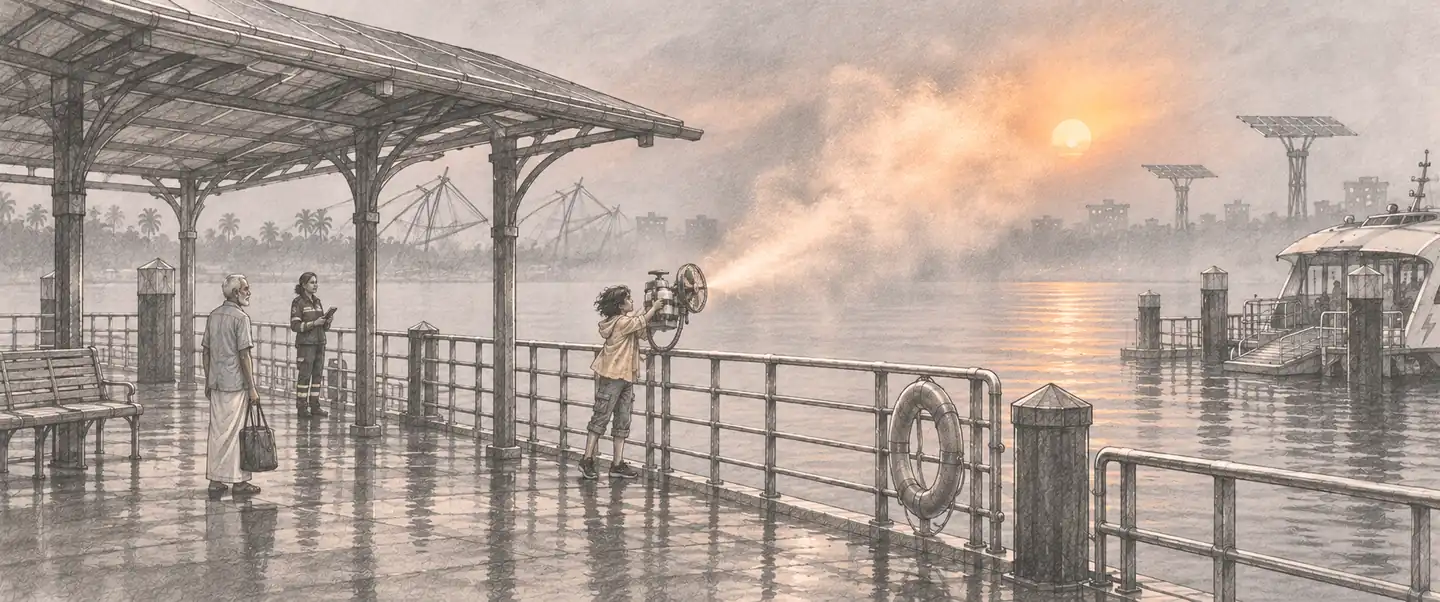
5.5 · Wide shot · Slow push in, 24mm · 6s
A clumsy mist rises and catches the sun
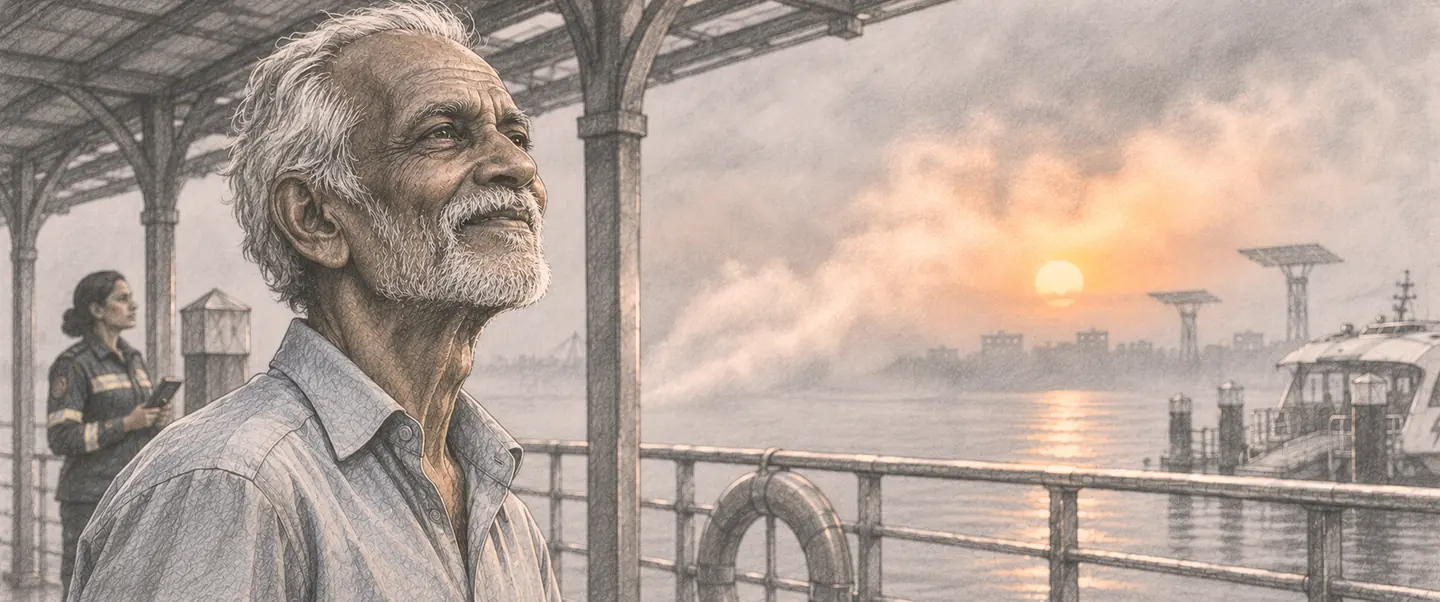
5.6 · Medium close-up · Static, 85mm · 4s
Appu sees the mist and almost smiles
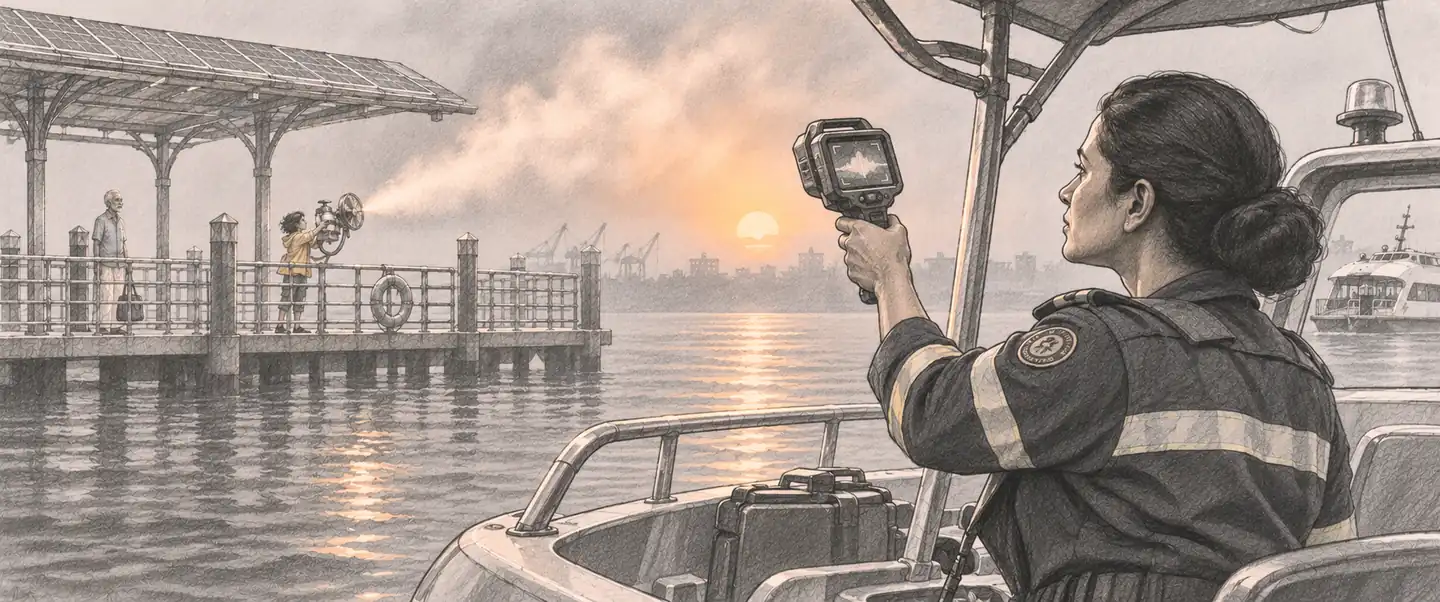
5.7 · Medium shot, from the patrol boat · Static, 50mm · 4s
Rani raises her scanner
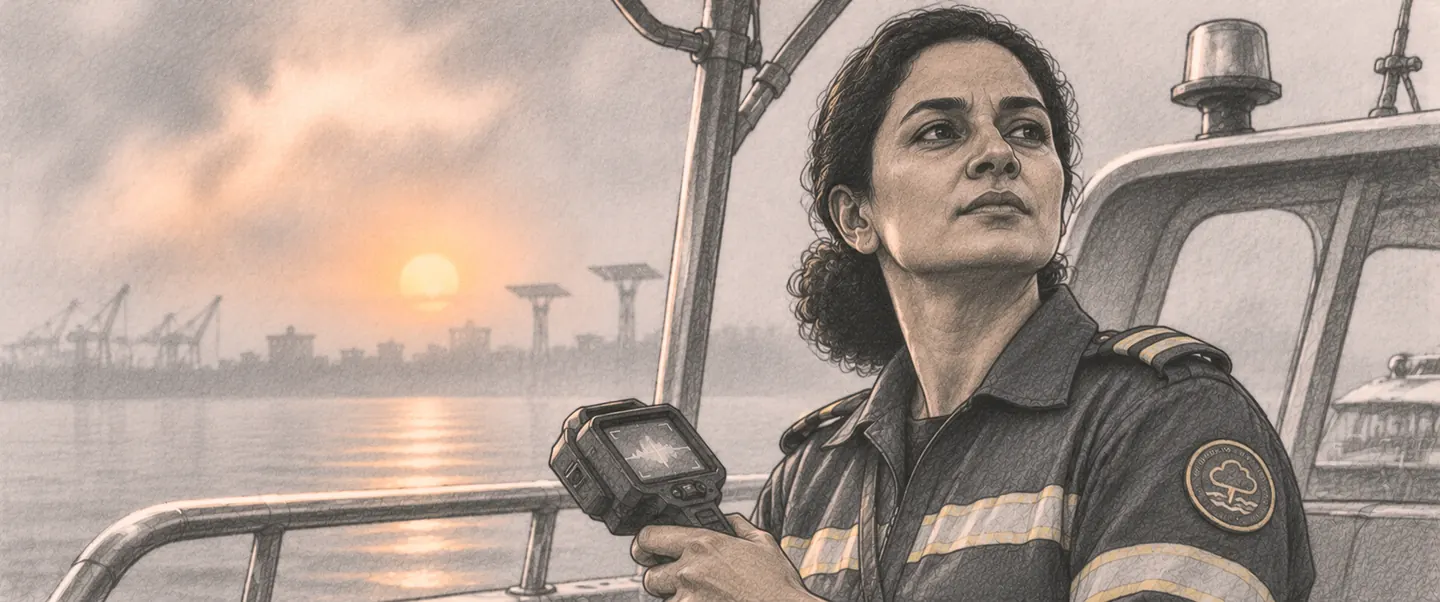
5.8 · Close-up · Static, 85mm · 2s
Rani lowers the scanner and looks away

5.9 · Close-up insert, top shot · Static, 50mm · 4s
The paper boat floats on the wet deck

5.10 · Two-shot, medium · Static, 35mm · 5s
"Bye, Appu." He touches her head

5.11 · Extreme long shot · Static, 24mm, hold · 6s
The ferry slides into the mist; Meenu stays at the railing
If a character changes face from frame to frame, upload your best frame of that character and say: keep this person exactly the same.
- Write locked lines for your main character, location and style.
- Build prompts for three shots and generate them.
- Lay the three frames out as a board with shot information.
Agencies often show the client an AI frame board first, then commission an illustrated board for the approved idea.
In an AI film the AI frame board is the start of the film itself: each approved frame goes into an image to video model.
How is a storyboard different from a shot list and an animatic?
Short answer. The shot list describes each shot in words, the storyboard shows it as a picture, and the animatic plays the pictures in time with sound.
Shot list, storyboard and animatic
The shot list, storyboard and animatic are three ways of planning the same shots. The shot list is a table of words, the storyboard is a strip of pictures, and the animatic is those pictures edited in time with sound.
Table 3 shows what each one adds.
| Shot list | Storyboard | Animatic | |
|---|---|---|---|
| Form | Table of words | Pictures in order | Pictures in time with sound |
| Shows | Size, angle, lens, movement, equipment | Composition and movement | Timing and rhythm |
| Made by | Director and cinematographer | Director or artist | Editor or animator |
| Used for | Scheduling and gear | Explaining the look | Testing the cut |
For most student films, a shot list plus thumbnail storyboard is enough. Make an animatic only for a scene where timing is everything.
- Write the shot list for one scene.
- Draw its storyboard.
- Time each panel with a stopwatch to make a rough animatic.
A shot list of 20 rows and a two-page thumbnail board are enough for a one day shoot.
Advertising films usually go to the client as an animatic before the shoot is approved.
Questions beginners ask
A series of panels, one per planned shot, each with a picture and notes on action, dialogue and camera, showing how the film will look before it is shot.
The frame in the film’s aspect ratio, the scene and shot number, the shot size, the action, any dialogue and arrows for camera or character movement.
No. Clear frames, readable shot sizes and clear arrows matter more than artistic skill; stick figures work.
A shot list describes each shot in words in a table; a storyboard shows each shot as a picture.
A storyboard edited in time with dialogue, music or sound, used to test timing before shooting or animating.
Yes. Write one prompt per shot with fixed descriptions of the characters, location and style, so the frames stay consistent.
References
- Hart, J. (2008) The art of the storyboard: A filmmaker’s introduction. 2nd edn. Burlington: Focal Press.
- Katz, S. D. (1991) Film directing shot by shot: Visualizing from concept to screen. Studio City: Michael Wiese Productions.
Further reading
- Begleiter, M. (2010) From word to image: Storyboarding and the filmmaking process. 2nd edn. Studio City: Michael Wiese Productions.
Make this your craft at Creative Hut Academy
Creative Hut Academy in Mattakkara, Kottayam, Keralam teaches photography, cinematography, editing, sound and AI filmmaking in one-year residential diplomas. Students come from across India.
Want to talk? Message us on WhatsApp, or ask Cham, our AI mentor, a study doubt.